How to make Angular and WebAssembly work together

In this blog post I will explain how you can make an Angular app work with WebAssembly code. This combination of technologies can bring interesting advantages to web development and it is fairly simple to implement.

As I write this post, Angular is currently at version 5.1 and WebAssembly is still in its initial version, but it is making fast progress since Chrome, Edge, Firefox, and WebKit have reached a consensus on the binary format and API (see their roadmap).

Create the Angular App

Let’s start with the Angular app. If you are not familiar with Angular, you should visit its website and read its quick start guide and related documentation. You should be able to easily create a boilerplate app with the ng command (see angular CLI). We can start creating a new project called “ng-wasm”:

ng new ng-wasm

The generated project will have some basic source code and configuration files ready to be used. You should be able to serve the app right away and test it with the following command:

ng serve --open

The app should load on the web browser at http://localhost:4200/

Create the WebAssembly Code

The second step now is the creation of the WebAssembly code. If you are not familiar with WebAssembly, you should visit their website and go through the documentation. You will have to download and install the emsdk package.

Angular will need access to the WASM code we will create, so the easiest solution for us is to create a cpp folder inside the src folder of the Angular project. The Angular project should then have a structure that looks like this:

ng-wasm/
 +-- e2e/
 +-- node_modules/
 +-- src/
     +-- app/
     +-- assets/
     +-- cpp/           <-- NEW FOLDER
     +-- environments/

Inside the cpp/ folder let’s create a file called main.c with the following C code:

#include <string.h>
#include <emscripten/emscripten.h>

double EMSCRIPTEN_KEEPALIVE multiply(double a, double b) {
    return a * b;
}

int EMSCRIPTEN_KEEPALIVE get_length(const char* text) {
    return strlen(text);
}

int main() {}

Basically we have implemented two C functions that we will be able to call from Angular. Note that we have to decorate these functions with EMSCRIPTEN_KEEPALIVE, which prevents the compiler from inlining or removing them.

We can now compile this code with the following command:
emcc \
    -O3 \
    -s WASM=1 \
    -s "EXTRA_EXPORTED_RUNTIME_METHODS=['ccall']" \
    -o webassembly.js \
    main.c

Note that I compile the C code with optimizations on (-O3 parameter), which makes the output more compact and efficient (if possible). The WASM=1 option tells the compiler to generate WebAssembly code (without this parameter, it would generate asm.js code instead). The EXTRA_EXPORTED_RUNTIME_METHODS=[‘ccall’] option is needed because we want to call the C functions from Javascript using the Module.ccall() javascript function (see the Angular code in the next section). I encourage you to read more about these parameters and play with them in order to see what errors or changes you will get.

Once you compile the C code, two files will be generated in the cpp/ folder:
  • webassembly.js — Javascript glue code that helps loading the webassembly code (wasm)
  • webassembly.wasm — Intermediate binary code to be used by the browser to generate machine code

The WebAssembly code is now ready to be used. Let’s go back to the Angular project now.

Modify the Angular Project

The default project created by the angular CLI contains an app/ folder with the following contents (among other files):

ng-wasm/
 +-- src/
      +-- app/
           +-- app.component.ts
           +-- app.component.html
           +-- app.component.css

Let’s change the app.component.ts file to have the following code:

import { Component } from '@angular/core';

declare var Module: any;

@Component({
    selector: 'app-root',
    templateUrl: './app.component.html',
    styleUrls: ['./app.component.css']
})
export class AppComponent {
    multiplyResult: number;
    getLengthResult: number;

    multiply(a: number, b: number): void {
        this.multiplyResult = Module.ccall(
            'multiply', // function name
            'number', // return type
            ['number', 'number'], // argument types
            [a, b] // parameters
        );
    }

    getLength(s: string): void {
        this.getLengthResult = Module.ccall(
            'get_length', // function name
            'number', // return type
            ['string'], // argument type
            [s] // parameter
        );
    }
}

In this code we implement two methods of the AppComponent class that will forward the call to our WebAssembly code generated in the previous section.

The first thing you should notice is the “declare var Module: any” at the top of the file. This is the typescript way of saying “there is a global variable named Module that I want to use in this scope”.The Module variable is actually a Javascript object used by the WebAssembly glue code. We declare it using type “any” because we don’t want typescript to complain about the things we will do with it. You should NOT do that in production code. It should be fairly simple for you to create a typescript definition file with class and method signatures (see my previous blog post where I discuss this).

Inside the multiply() member function we can call WebAssembly code using the Module.ccall() javascript function:

Module.ccall(
    'multiply', // function name
    'number', // return type
    ['number', 'number'], // argument types
    [a, b] // parameters
);

In such call we pass the function name, return type, argument types and actual parameters to the binary function.

Now let’s change the app.component.html code in order to build our user interface:

<button (click)="multiply(10.5, 21.2)">
    Call multiply(10.5, 21.2)
</button>
<div *ngIf="multiplyResult">
    multiply result is {{ multiplyResult }}
</div>

<button (click)="getLength('Testing String Length')">
    Call length('Testing String Length')
</button>
<div *ngIf="getLengthResult">
    get_length result is {{ getLengthResult }}
</div>

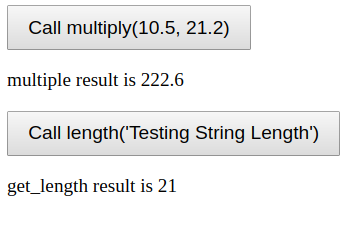
This HTML code adds two buttons to the page. The first button will call the multiply() function with two parameters (10.5 and 21.2), and the second button will call the getLength() function with “Testing String Length” parameter.

The Last Step

If you try to serve the existing source code with the ng serve command, you will notice that Angular doesn’t automatically load the WebAssembly code we have added to the src/cpp/ folder. We have to manually change the index.html file (inside the src/ folder) and add the following code snippet to the end of the <head> section:

‹script›
var Module = {
    locateFile: function(s) {
        return 'cpp/' + s;
    }
};
‹/script›script src="cpp/webassembly.js"›‹/script

This code imports the Javascript glue code generated by the WebAssembly compiler, but it also defines a Module.locateFile() function that will be used by WebAssembly to find the WASM file. By default, WebAssembly will try to find the WASM file at the root level of the application. In our case, we keep that file inside the cpp/ folder, so we have to prepend that folder’s name to the file path.

Now everything should be fine to go and the app should look like the screen below (with a bit of CSS makeup).
angular_component_html

Conclusion

Angular and WebAssembly are two great technologies that can be used together without too much effort. There is no secret in this combination since both technologies are designed to work with web browsers and Javascript code is a common byproduct of their operations.

WebAssembly is still under development, but it has a huge potential towards native code performance, which is a dream yet to come true for web applications. Its roadmap is full of amazing features that serious web developers should never turn their back on.


Comparing the volatile keyword in Java, C and C++

The volatile keyword exists in some programming languages, including Java, C and C++. I want to discuss in this blog post the differences, similarities and some details that every programmer should know about this keyword and help you understand how it affects your code. My focus will be only on Java, C and C++ because those are the languages I have most experience with. Feel free to share in the comments information about how other programming languages deal with the volatile modifier.

You probably know that Wikipedia has a good article about the volatile keyword, but the article doesn’t go very deep into the language details. The goal of this blog post is to compare the languages side by side and provide a bit more knowledge to anyone who is interested in this subject.

Declaring a volatile variable in Java

In Java, you can only add the volatile keyword to class members:

public class MyClass {
   private volatile int count = 0;
   public static volatile int sum = 0;
}

Arrays can be volatile, but the elements won’t be volatile:

volatile int[] numbers = new int[10];
...
numbers[0] = 5;  // not volatile

Local variables cannot be volatile:

public void doStuff() {
   volatile int count = 0; // Error: illegal start of expression
}

Declaring a volatile variable in C and C++

In C and C++, the volatile keyword can be applied to local and global variables:

volatile int globalNumber = 0;
int* volatile pInt; // volatile pointer to nonvolatile int
volatile int* volatile pInt2; // volatile pointer to a volatile int

void doStuff() {
   volatile float localNumber = 5.0f;
}

structs can also have volatile fields:

struct A {
   volatile double n = 0.0;
};

In C++, class members can also be volatile:

class T {
   volatile long id = 0;
};

C++ also allows the volatile qualifier to be applied to return values, parameters and class methods. This is explained at the end of the post (see below).

In Java, volatile means memory visibility

When a variable is declared volatile in Java, the compiler is informed that such variable is shared and its value can be changed by another thread. Since the value of a volatile variable can change unexpectedly, the compiler has to make sure its value is propagated predictably to all other threads. Let’s consider a simple piece of code:

volatile boolean isDone = false;
public void run() {
   while (!isDone)
      doWork();
}

The isDone variable is declared volatile. If that variable is set to true by another thread, this piece of code will read the new value and immediately leave the while-loop. If we forget to add the volatile modifier to that variable, there is a good chance the loop will never finish if the variable is set to true by another thread.

If a variable is declared volatile, all threads must read its most recent written value. The JVM does not cache volatile variables in registers or other caches that are hidden from other processors. This gives visibility to the variable and is considered a weaker form of synchronization between threads.

In Java, the volatile keyword guarantees memory visibility and it is meant to be used in concurrent programming.

In C/C++, volatile means no optimizations

In C/C++, optimizations are done by the compiler. Most compilers have command line parameters that allow you to specify different levels of optimization. For example, take a look at some options from CLANG:

-O0 = no optimization
-O1 = somewhere between -O0 and -O2
-O2 = Moderate level of optimization, which enables most optimizations
-O3 = Like -O2 with extra optimizations to reduce code size

Some compiler optimizations include removing unused assignments and reordering of memory operations. This is easy to check with the gcc.goldbolt.com website, let’s take a look at a simple example:

cpp1

This code has an int variable x that receives a useless assignment on line 2. The compiler detects this issue, ignores the value 10 and decides to return 30 directly (see assembly code on the right).

The volatile keyword in C/C++ disables all optimizations on a variable. If we try the same code again, but with the volatile modifier applied to the x variable, the assembly code looks totally different:

cpp2.png

Now the useless assignment isn’t removed by the compiler and the assembly code on the right reflects exactly the source code on the left. You may ask why would someone use this kind of less efficient code. One answer is memory-mapped I/O, where Gadgets and electronic peripherals (e.g., sensors, displays, etc.) must communicate with the software in a very specific way. Optimizations could break the communication with those electronic parts.

Still in this topic, I have found an interesting difference between GCC and CLANG when it comes to optimizations and the volatile keyword. You can check it out in my previous article: a note about the volatile keyword in c++

In C/C++, the volatile keyword is NOT suitable for concurrent programming. It is meant to be used only with special memory (e.g., memory-mapped I/O).

In Java, volatile doesn’t guarantee atomicity and thread-safety

A common misunderstanding about the volatile keyword in Java is whether operations on such variables are atomic or not. The answer to this question can be YES and NO, so it depends on what the code is doing. Let me explain.

Operations are atomic if you look at individual reads and writes of the volatile variable. In other words, reading or writing a value works as if you are entering a synchronized block. So the integrity of the value is kept safe and there is no chance you will read a broken value because some other thread was still in the process of writing it.

Operations are NOT atomic if the code has to read the value before updating it. For example, consider this code:

volatile int i = 0;
i += 10;  // not atomic

The += operator isn’t atomic because operations on volatile variables perform no locking. Because there is no locking, the executing thread cannot block other threads before the operation is completed. So read-update-write sequences on volatile variables are not thread-safe in Java. Another thread could just sneak into the sequence and create a race condition.

One way of implementing atomicity in Java is to use atomic classes from the java.util.concurrent.atomic package, like AtomicInteger, AtomicBoolean, AtomicReference, etc. The previous code would look like this:

AtomicInteger i = new AtomicInteger(0);
i.addAndGet(10);  // atomic

In C/C++, volatile can be used in return types and parameters

C++ allows return types and parameters to be volatile. The following function takes a volatile int parameter and returns another volatile int:

volatile int work(volatile int x) {
  return x + 1;
}

As discussed before, the only difference the volatile qualifier makes in this case is that it won’t be optimized by the compiler. The same function without the volatile keywords would be optimized. Here is the assembly code generated by the CLANG compiler:

volatile_function

Now compare the same function without the volatile qualifiers. The assembly code is simplified:

nonvolatile_function.png

In C++, volatile can also be used in class methods, constructors and operators

C++ also allows you to use the volatile qualifier in class methods. Here is a simple example:

class MyClass {
  public:
   int normalMethod() { 
      return 1; 
    }
   int volatileMethod() volatile { 
      return 2; 
    }
};

If an instance of this class is declared volatile, then the code can only call volatile methods on that object:

int main() {
   volatile MyClass a;
   a.normalMethod();  // error: nonvolatile method cannot be called
   a.volatileMethod();  // OK 
   return 0;
}

If the instance is not volatile, then the code can call both volatile and nonvolatile methods:

int main() {
   MyClass a;
   a.normalMethod();  // OK
   a.volatileMethod();  // OK 
   return 0;
}

Conclusion

The meaning of the volatile keyword differs from language to language and this blog post briefly explains how it works in Java, C and C++.

In Java, volatile variables are meant to be used in multithreaded contexts. Threads that concurrently read a volatile variable will always read its latest value, which means the JVM will not cache the variable internally and its value will be shared across all processors.

Atomicity and thread-safety in Java are not guaranteed by volatile variables. In summary, you should use the volatile keyword if writes to the variable do not depend on its current value, or you can ensure that only a single thread ever updates the value. Besides that, there shouldn’t be other variables participating in the concurrent state of the class, otherwise you will have race conditions. Finally, remember that locking is not required for any other reason while the variable is being accessed.

In C/C++, the volatile keyword is meant to be used with special memory: manipulating I/O registers or memory-mapped hardware. All optimizations on those variables will be disabled, which means that assignments and their order will be preserved. The volatile qualifier doesn’t help us in multithreaded code.

We can finish with a table that summarizes the points discussed:

Java C / C++
Purpose Concurrent Programming Special Memory (e.g., memory mapped I/O)
What difference does it make? Adds visibility to the variable Disables optimizations on the variable
Is the operation atomic? Yes for individual reads and writes;

No if the write depends on the current value;

No
Applies to class fields local and global variables;

return types;

function parameters;

class fields and methods (C++ only);

A note about the volatile keyword in C++

The volatile keyword in C++ is poorly misunderstood. Lots of developers believe that it makes the declared variable an atomic variable, but that’s wrong. The truth is that you should use std::atomic or related code (e.g., mutex) on a variable if you want to guarantee atomic operations in a multithreaded context.

What I want to discuss in this article is something else. Before I start you should remember that the volatile keyword should be used when you want to tell the compiler to not optimize a given variable. It basically says “don’t perform any optimizations on operations on this memory because something else outside the program (which the compiler is not aware of) may change it”. The most common use of volatile is in memory-mapped I/O. Gadgets and electronic peripherals (e.g., sensors, displays, etc.) may communicate with the software and optimizations could break the code.

The use of the volatile keyword has caught my attention recently and I want to show you a curious thing about it. I will go through some code examples and I will use an amazing online tool called gcc.godbolt.org to look at the assembly code generated by the compiler.

With the GCC compiler

Let’s start with a very simple example without the volatile keyword. As you can see in the code below, we have an int variable and a while loop. The GCC compiler realizes that the variable will never change its value and the loop will never finish. So it optimizes the assembly code by ignoring the variable check and keeps jumping forever back to the L2 label.

no_volatile

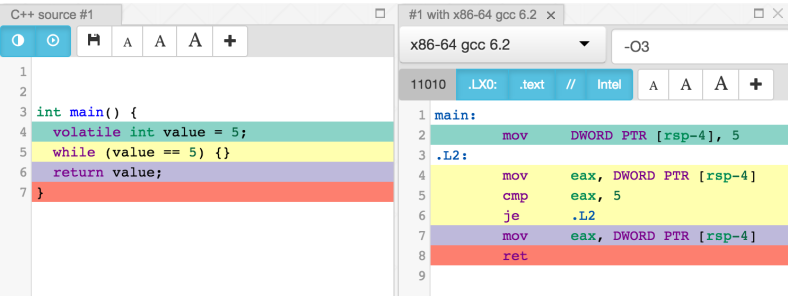
Now consider the same code, but let’s add volatile to the declaration of the int variable on line 4. As we can see, the GCC compiler now generates an assembly code that is totally different than the previous example and it respects the value == 5 check inside the loop.

volatile1.png

Now let’s change this example a little bit. What would happen if we move the int variable into a struct? Consider the code below without the volatile keyword. The assembly code is the same as in the first example. The GCC compiler ignores the loop check and keeps jumping forever.

no_volatile2

If we want to tell the compiler to not optimize the int variable, should we add the volatile keyword to the int variable declaration inside the struct? Let’s see how this would work:

volatile2

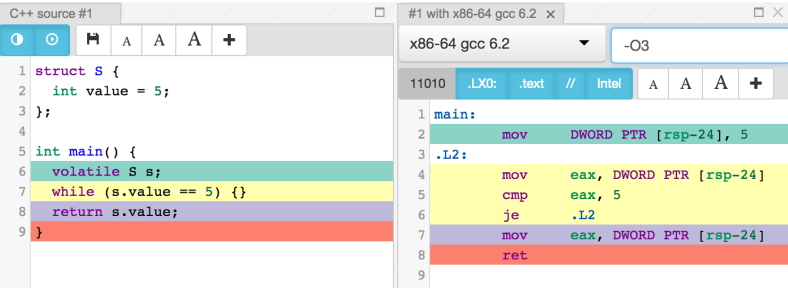
As we can see, the GCC compiler simply ignored the volatile definition inside the struct and optimized away the loop again. A careless developer could easily assume that code was correct and move on to other tasks. Bugs later would require hours of debugging in order to find the source of the problem. The real solution here is to add the volatile keyword to the struct object on line 6:

volatile3.png

I’ve tried different versions of GCC they all have the same result regarding this issue. Now let’s try CLANG and see what happens.

With the CLANG compiler

Using clang 3.9 we can start without the volatile keyword. As you can see below, the loop is optimized just like it happened with the GCC compiler.

clang0.png

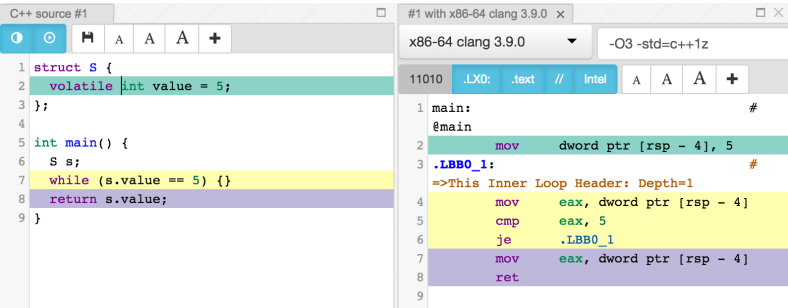
Now let’s try the volatile keyword in the struct member variable. We have a surprise here: CLANG doesn’t optimize the loop like GCC did. I tried older versions of CLANG and the output is the same.

clang1.png

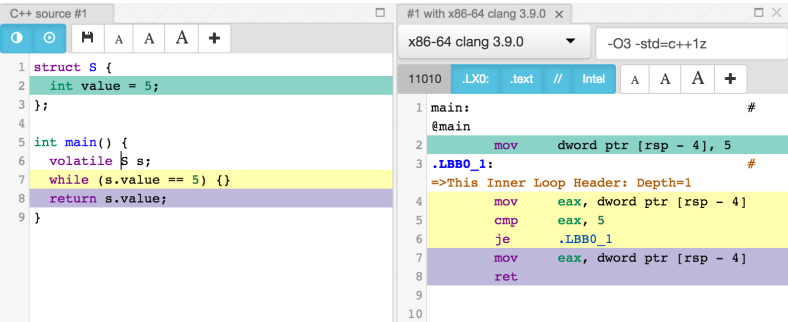
We get the same result when we move the volatile to the object on line 6.

clang2.png

So which compiler is the correct one?

It seems to me that CLANG is doing a better job than GCC because the loop deals with the struct object and its member variable. So if the volatile modifier is present either in the object or in its member, then the compiler has to respect that in the loop.

If you have more thoughts about this, please leave comments below.

EDIT 1: I posted this discussion on reddit and we have some great comments there.

EDIT 2: This issue was also discussed on the CppCast Episode 76 with Dan Saks, check it out: http://cppcast.com/2016/10/dan-saks/

Reading text files line by line: Java, C++ and C benchmark

I wanted to compare how Java, C++ and C perform when reading a text file line by line and printing the output. I’ve implemented some possibilities and, at the end, we can compare the speed of each execution.

Java 7 version (BufferedReader)

import java.io.BufferedReader;
import java.io.File;
import java.io.FileReader;
import java.io.IOException;

public class Main7 {

   private static final String FILENAME = "/path/to/file.txt";

   public static void main(String[] args) throws IOException {
      File file = new File(FILENAME);
      BufferedReader br = new BufferedReader(new FileReader(file));
      for (String line; (line = br.readLine()) != null; ) {
         System.out.println(line);
      }
   }
}

Java 8 version (Stream)

import java.io.IOException;
import java.nio.file.Files;
import java.nio.file.Paths;
import java.util.stream.Stream;

public class Main8 {

   private static final String FILENAME = "/path/to/file.txt";

   public static void main(String[] args) throws IOException {
       try (Stream stream = Files.lines(Paths.get(FILENAME))) {
           stream.forEach(System.out::println);
       }
   } 
}

C++ (ifstream)

#include < iostream>
#include < fstream>
#include < string>

using namespace std;

int main() {
   const constexpr char* FILENAME = "/path/to/file.txt";
   ifstream file(FILENAME);

   string line;
   while (file.peek() != EOF) {
      getline(file, line);
      cout << line << '\n';
   }
   file.close();
   return 0;
}

C (FILE)

#include < stdio.h>
#include < stdlib.h>

int main(void)
{
   FILE* fp = fopen("/path/to/file.txt", "r");
   if (fp == NULL)
      exit(EXIT_FAILURE);

   char* line = NULL;
   size_t len = 0;
   while ((getline(&line, &len, fp)) != -1) {
      printf("%s", line);
   }

   fclose(fp);
   if (line)
      free(line);
   exit(EXIT_SUCCESS);
}

Performance

Below you can see how each program above performs reading a TXT file with 10,440 lines (file size is 3.5Mb).

 Version  Time
 Java 7 (BufferedReader)  0.254 seconds
 Java 8 (Stream)  0.324 seconds
 C++ (ifstream)  0.429 seconds
 C (File)  0.023 seconds

As we can see, C is by far the fastest option. I am surprised that C++ isn’t faster than Java, but this is probably because of the ifstream and std::getline() implementation. This is not the first time I see the Standard Library with performance issues compared to other languages (the regular expression implementation was the first time).